How Can You Remove a Factory Window Tint

How Can You Remove a Factory Window Tint?

Removing the factory tint from your car windows can be quite a task. Tint film is composed of two layers. When pulled, the top layer may come off without too much trouble but leave the second layer behind. The most effective system includes pulling both layers together. If done incorrectly, you may spend hours scraping off the stuck pieces of tint. With the proper steps, you can remove the factory tint yourself and save the money a professional would charge to do the job for you.

Instructions

Windshields

    1

    Remove any obstructions from the window, such as the rear brake light.

    2

    Spray the outside of the window with water and then cover it with plastic. Cut away excess plastic so that the tarp is roughly the shape of the window.

    3

    Lay a tarp across the rear deck and seats. Cover the front dashboard with plastic. Spray the inside of the window with pure ammonia. You may want to wear a face mask. Ammonia is very strong.

    4

    Cover the ammonia-soaked window with plastic and secure the plastic with tape.

    5

    Park the car in a sunny area. Leave the car for one hour.

    6

    Peel the tint off the window. Remove the plastic from the corner of the window. Leave as much the window covered as possible so the ammonia does not evaporate.

    7

    Spray the corner again with ammonia. Use a razor to pull away the corner of the tint. Be careful not to cut through any defroster lines or antennas. Once the corner rises, grab the loose piece with both hands and pull it away from the window. Pull slowly and with consistent pressure; the goal is to pull the film off in one piece. You will pull the plastic off as the tint pulls away from the window. If necessary, spray ammonia as you pull. If the tint film breaks, spray ammonia and use the razor to restart it.

    8

    Scrub off the adhesive residue stuck to the window once the film comes off. Spray the window glass again with ammonia. Use a fine steel wool pad to scrub off the adhesive.

    9

    Spray the window with window cleaner and wipe it down with paper towels or newspaper.

Side Windows

    10

    Spray the window down with warm, soapy water. Let soak for two or three minutes.

    11

    Use a razor blade in a holder and cut an opening in the tint.

    12

    Slide the blade under the tint at the opening you cut. Pull enough of the tint film away so you can grasp it with your hands.

    13

    Pull the film, using both hands, away from the window. Remove the film in segments until the window is clear.

    14

    Spray the window down again with warm, soapy water. Scrape away any adhesive residue. Clean the window with spray cleaner and paper towels.

Read More..

How to Replace Ford 4WD Front Disc Brakes

How to Replace Ford 4WD Front Disc Brakes

In tough economic times, people look for different ways to save money. One of those can be making as many of the necessary repairs to your Ford 4WD yourself. This includes replacing the front disc brakes, which is a task you can do in your driveway or garage. The brakes on the front of your truck will wear much faster than those on the rear. When you start hearing a high-pitched noise coming from the front end when you apply the brakes, youll know its time to service them. However, never depend on that as your sole indicator; you need to inspect them periodically.

Instructions

    1

    Park the truck on a level surface and place the wheel chocks behind the rear wheels. Open the engine compartment and remove 2/3 of the brake fluid from the master cylinder into the drain pan. Jack the truck up with the automobile jack and place a jack stand underneath near the jacking point. Raise the jack stand up to the frame of the truck.

    2

    Remove the wheel using the lug wrench. Remove the brake caliper using a socket and ratchet. The retaining pins are on the back side of the caliper.

    3

    Retract the brake caliper piston back inside the caliper by attaching the C-clamp to the caliper and using the old brake pad as a contact surface. Tighten the C-clamp until the caliper piston seats itself into the caliper.

    4

    Inspect the brake rotor for visible signs of damage. If the rotor has grooves worn into it from bad brake pads, then it will have to be machined smooth or you need to replace it if the damage is too bad.

    5

    Place the new brake pads into the caliper, clipping them in place with the clips attached to the pads. Place the caliper back on the axle and tighten the retaining pins with the socket and ratchet.

    6

    Put the wheel back on the truck and tighten the lug nuts with the lug wrench. Remove the jack stand and lower the truck back to the ground. Repeat the process on the other wheel.

    7

    Once you finish both sides, pump the brakes several times until the brake pedal is firm when you depress it. This allows the brake pads to settle evenly onto the brake rotors. Check the fluid level in the master brake cylinder and replace it as necessary.

Read More..

How to Repair Brake Caliper Slides on the Honda Civic EX

How to Repair Brake Caliper Slides on the Honda Civic EX

The front calipers on the Honda Civic EX are known as sliding calipers. The two bolts holding the calipers in are screwed into pins that are designed to allow the caliper to slide, slightly, back and forth. Over time, these pins can become rusty or just covered in debris, which prevents them from sliding as freely. This lack of movement can cause one brake pad to constantly rub against the rotor and wear out faster. Fortunately, these pins can be removed and reconditioned with relative ease.

Instructions

    1

    Loosen the lug nuts from the Civics front wheels.

    2

    Place the floor jack beneath the Civic and raise the front end.

    3

    Put jack stands beneath the vehicle to secure it.

    4

    Remove the front wheels by removing the lug nuts and pulling the wheel off.

    5

    Look on the rear of the brake caliper and locate the upper and lower bolts, known as caliper bolts.

    6

    Loosen and remove the caliper bolts, using the ratchet and socket. If the pin that the bolts screw into spins, use the open end of a combination wrench to hold, keeping it from turning.

    7

    Pull the caliper from the brake assembly and attach it to a suspension component using a bungee strap.

    8

    Look on the caliper bracket, the metal object that the caliper was bolted to. Locate the two caliper pins, the two objects that the caliper bolts were screwed into.

    9

    Remove the caliper pins by grabbing them with the channel-lock pliers and pulling them outward. A light twisting motion may help. Notice the rubber boots will remain attached to the caliper bracket, pull these rubber boots from the bracket.

    10

    Insert the metal pipe cleaner into the holes in the caliper bracket where the caliper pins were inserted. Clean the entire bore of these holes with an in-and-out motion of the metal pipe cleaner.

    11

    Place the rubber boots back on the caliper bracket until they properly sit on the grooves provided.

    12

    Remove any rust or debris from the caliper pins, using the wire brush. Never use sandpaper, as this creates a rough surface and limits the pins ability to slide.

    13

    Spray the pins with the brake parts cleaner and wipe them with a shop rag.

    14

    Repeat steps 10 and 11 until the pins are completely clean and smooth.

    15

    Apply a generous coat of an anti-seize chemical to the length of both pins and reinsert them into the caliper bracket. Make certain the rubber boots sit in the grooves on the pins.

    16

    Remove the caliper from the bungee strap and place it over the brake pads.

    17

    Hand-tighten the upper and lower caliper bolts.

    18

    Hold the caliper pins with the open end of a combination wrench, and tighten the caliper bolts, using a ratchet and socket.

    19

    Repeat steps 5 through 18 for any other caliper pins needing repair.

    20

    Place the wheels back on the Civic and hand-tighten the lugs.

    21

    Remove the jack stands from under the vehicle, and slowly lower it to the ground.

    22

    Tighten the lugs to 80 foot-pounds, using the torque wrench and a socket.

    23

    Press and release the brake pedal to ensure the brakes are working properly.

Read More..

Peugeot 2008 to be launched in Malaysia soon


Read More..

From 0 to 100 Sprint

In kph or mph?
whichever...

A stretch of "Persiaran Timor" to the south of Putrajaya runs in parallel with Sungai Langat is just perfect for the sprint test up to and beyond 160kph. It is a six-lane dual carriageway. There is a 2-km flat and straight part of the road, virtually no traffic at dusk. I was on my way back from Cyberjaya then. [Putrajaya Hospital is also not very far away... just in case]
A GPS-datalogger and MapSource were used for the data recording and processing respectively. The same set of equipment was also used for testing myPeugeot 206 before.

"0 to 100kph" or "0 to 100mph" sprints... in less than 9sec and 25sec respectively. The "Century acceleration" on tiptronic* is about 400ms faster than the time recorded during previous test on AUTO.

*The advantage of TIPTRONIC is that the accelerator pedal need not be depressed while up-shifting, hence faster acceleration and smoother speed curve. However as can be seen from the "speed vs time" chart there are slight dips and surge during upshift at the end of 1st gear @050kph, 2nd gear @100kph and 3rd gear @160kph during which the torque dropped below 180Nm. After shifting up there was a soft jerk as the torque surged above 210Nm when the rpm dropped to app. 4000rpm.

A similar test [by others] using a different device also recorded 8.9sec for the 0~100kph sprint.

Will do the same test after the 10,000th km Service.


Frequently Visited Pages:
| Home | Fuel Consumption | Performance | uncles DIY |
Car Size Comparison | Motoring Myths | RON95 |
Read More..

How to Replace Drum Brake Shoes

How to Replace Drum Brake Shoes

Virtually all vehicles manufactured up to the mid-1970s used drum brakes on all four wheels. However, most modern vehicles use disc brakes on the front of the vehicle and drum brakes on the rear only. Drum brakes operate when the internal brake shoes press out against a drum that rotates with the wheel. The brake shoes on your drum brakes will eventually wear out and will need to be replaced.

Instructions

    1

    Raise the rear of the vehicle with a hydraulic jack. Place jack stands under each side of the rear axle. Lower the hydraulic jack so that the rear of the vehicle is supported by the jack stands.

    2

    Remove the lug nuts from the rear wheels with a lug wrench turned in a counterclockwise direction. Remove the rear wheels from the vehicle and set them aside. Slide the brake drums off of the rear wheel hubs and set them aside.

    3

    Work on one side of the vehicle at a time. Locate both brake shoes on the right and left side of the wheel hub. Locate the brake shoe return spring which connects the two brake shoes at the top of the wheel hub. Remove the brake shoe return spring by placing a pair of brake spring pliers over the end of the spring. Pull on the pliers to stretch the spring until it can be unhooked from the brake shoes. Remove the spring and set it aside.

    4

    Place a brake shoe removal tool over the circular brake shoe retainer clip, located at the center of each brake shoe. Push down on the tool and rotate it counterclockwise. Remove the tool, the retainer clip, and the spring behind the clip and set them aside. Repeat this step for both brake shoes.

    5

    Pull the brake shoes from the wheel hub and discard them. Place new brake shoes into the same position as the old shoes, making sure the pin the retainer clip attaches to protrudes through the mounting hole at the center of the brake shoes. Place the spring and retainer clip over the pin and place the brake shoe removal tool over the clip. Push down on the tool and rotate it clockwise until the clip locks into place.

    6

    Position the hook on one end of the return spring into the hole at the top of one of the brake shoes. Use the brake spring pliers to stretch the spring until the hook in the other end of the spring is positioned into the hole at the top of the other brake shoe. Slide the brake drum back over the hub.

    7

    Repeat the above steps for the other rear wheel. Replace the wheels and tighten the lug nuts with a lug wrench in a clockwise direction. Raise the rear of the vehicle with a hydraulic jack and remove the jack stands from under the vehicle. Lower the vehicle and remove the hydraulic jack.

Read More..

0 100km hr on RON95 Part 2 in S Auto Mode

[Note: Somebody had recorded and published "more than 10 seconds" for the century acceleration without knowing that he and the ECU were actually on the learning mode]

AL4 gearbox is auto adaptive. The gearbox ECU must be told and taught for the desired driving style. Once the ECU has adapted to the requirement sure it can deliver...

Yesterday, there were some other cars on my favourite stretch for the sprint because I was a little bit late to workplace . The sprint test was aborted.

Today I left home a bit earlier. So I could do another sprint test freely at the same straight I did two days ago. Todays test was in S mode. Here is the logged data:

[click on the images to enlarge]
...and the familiar look chart.
See, even on RON95 the 308 performs similar to manufactures claim: "9.3 second for the 0~100km/hr acceleration". So, what does that mean? RON95 no good??


Frequently Visited Pages:
| Home | Fuel Consumption | Performance | uncles DIY |
Car Size Comparison | Motoring Myths | RON95 |
Read More..

Some Main Tools for Car Maintenance

There are some basic car maintenance tasks you can do by yourself. You only need to equip yourself with some main tools. With these tools, you dont need to call a road service for a simple maintenance task such as fixing tire or replacing the fluids. It will be able to help you save money in a long run.


Jack, Wrench and Tire Iron


How To Replace Brake Pads


You have to always remember to keep the car jack, wrench, and tire iron while on the go. It will be very beneficial if you get flat tire. Place the jack under the car close to the flat tire for lifting the car up so that you can easily remove the tire. Wrench will help you remove wheel lugs or bolt while the tire iron can help you secure the wheel lugs back to the spare tire while on the wheel. In addition, wrench is useful to remove oil tank bolt. You will use it in case you perform oil change.


Some Main Tools for Car Maintenance


Funnel for Fluids

Funnel will help you perform the maintenance task such as replacing fluids like transmission fluid, oil, and brake fluid. This is one of the most important parts of car maintenance. With this tool, you will be able to avoid the spillage while filling up the fluid reserves.

Tire Pressure Gauge

Tire pressure gauge will help you keep air in the tire at the appropriate level. Driving the car with low pressure air will reduce the efficiency of the fuel since under-inflated tire can make the engine work harder. Later, it can affect the steering. Therefore, before driving, you have to make sure that the tire pressure is at the appropriate level. To measure the tire pressure, you only need to place it over the nozzle of your tire. This tool shows you the reading on the tire pressure through the small poles which looks like a thermometer.

Battery Charger and Air Machine

Car battery charger is beneficial in case you are running out of the power since you accidentally leave the lights on. To solve your problem, you only need to attach the handles of charger to the according red and black connections and then switch the device on to charge it. Instead, you can also get the jumper cables and connect the handles to another car. In addition, you can also have an air machine for filling up the flattened tire.


Some Main Tools for Car Maintenance
2007 TOYOTA COROLLA Video Clips. Duration : 0.88 Mins.


2007 TOYOTA COROLLA Madison WI (608) 807-0468 www.zimbrick.com Formore information on this vehicle and our full inventory, call Internet Team at (608) 807-0468. Zimbrick Fish Hatchery Rd 1601 W Beltline Hwy Madison, WI 53713 ONE OWNER,LOCALLY OWNED TRADE,REMAINING FACTORY WARRANTY,AM CD PLAYER,AIR CONDITIONING,CRUISE CONTROL,POWER MIRRORS,POWER LOCKS,4 CYLINDER MOTOR,AUTOMATIC TRANSMISSION,REPLACE FRONT BRAKE ROTORS,REPLACE FRONT BRAKE PADS,INSTALL 4 NEW TIRES,BALANCE NEW TIRES,ALIGN ALL WHEELS,REPLACE TRNSMISSION PAN/GASKET,CHANGE OIL AND FILTER,SAFETY INSPECTION COMPLETED


Tags: 2007, Toyota, Corolla, Zimbrick, Fish, Hatchery, Rd

Read More..

How to Replace the Rotor in a Toyota Tundra

The Toyota Tundra utilizes brake discs, also known as rotors, in combination with a caliper and brake pad assembly to bring your vehicle to a stop. If the rotors get warped or worn down, it can cause your Tundra to shudder and pulse when you hit the brakes. Its fairly easy to swap the rotors yourself and keep some extra money in your pocket.

Instructions

    1

    Jack up your Toyota Tundra. Block the wheels that you arent working on to keep your Tundra from rolling while you work. Disconnect the negative battery cable. Remove the first tire and wheel assembly.

    2

    Remove the brake hose from the caliper and then quickly plug the end of the hose to prevent spillage. Next, remove the two caliper mounting bolts. This allows you to then pull the caliper assembly off of the old rotor.

    3

    Clean the area around the hub with a damp cloth to remove any dirt or corrosion. Install the new rotor onto the hub.

    4

    Lubricate the caliper slides and bolts with lithium grease and then install the caliper and tighten the bolts. Torque the caliper bolts to 90 ft. lbs. (123 Nm).

    5

    Reconnect the brake hose to the caliper and torque to 11 ft. lbs. (15 Nm). Refill the brake fluid and then bleed the brakes. Install the wheel assembly and tire.

    6

    Repeat this process for each additional rotor. When youre finished, lower your vehicle, double check the brake fluid level and reconnect the negative battery cable.

    7

    Pump the brakes until you get a firm pedal and then be sure to road test your Toyota Tundra to make sure that the installation was successful.

Read More..

How to Repair Windshield Dings

How to Repair Windshield Dings

At some point, most people have had a ding in the windshield of their car. Whether from a rock, hail or other debris, a windshield ding needs to be repaired so that it does not expand into a larger hole. Windshield repair work can be quite expensive if a professional is hired, and many insurance companies do not cover windshield repair. The good news is that you can fix a windshield ding yourself without spending a lot of money. There are a variety of types of windshield repair kits on the market. One of the most-common types uses a syringe and adhesive.

Instructions

    1

    Purchase a windshield repair kit to fix the windshield ding. You can purchase these kits at most auto parts and supply stores.

    2

    Clean the windshield thoroughly with glass cleaner and paper towels to remove any dirt and debris. Dry the windshield. The windshield should also be around room temperature or higher. The car may need to sit inside of a garage to get the windshield to an acceptable temperature.

    3

    Remove the adhesive strip from the windshield repair kit. Peel off the film backing on one side of the adhesive. The adhesive is already pre-cut.

    4

    Center the pre-cut adhesive over the ding in the windshield. Use your thumbnail or small blunt object to rub over the adhesive several times. Peel off the top film.

    5

    Adjust the enclosed plastic adapter so that the fitting is as upright as possible and stick it to the film. Rub the adhesive again with a blunt object or your fingernail.

    6

    Remove the cap from the enclosed syringe, holding it with the pointed end. Fasten the syringe to the plastic adapter.

    7

    Hold the body of the syringe with one hand so that it is stable. Extend the syringe handle as far as it will allow by pulling it up. Keep the handle in this position for one minute. The adhesive will make its way down through the ding and into the glass.

    8

    Push the syringe handle back down quickly after one full minute has expired. The pressure from releasing it quickly will force the adhesive down into the crack. Repeat this about six times, pulling the syringe handle up and slamming it down quickly.

    9

    Take away the syringe, as well as the adapter and adhesive sheet. You will notice a film on the glass from the adhesive. Dampen a paper towel with rubbing alcohol to remove the adhesive only from around the ding. Avoid putting alcohol onto the ding itself. Shave off any protruding adhesive from the ding with a razor blade.

Read More..

How to Change the Front Disc Pads on a 2001 Ford Expedition

The 2001 Ford Expedition came equipped with a four-wheel-disc brake system and four-wheel ABS. Inspecting the overall condition of the brake system regularly will allow you to identify worn brake-system components before they become a safety concern. Replacing the disc brake pads yourself, when they become worn, is a good way to keep your vehicle repair costs down while maintaining the safety of your Expedition. This repair can be completed in about an hour using basic hand tools.

Instructions

    1

    Apply the parking brake. Place wheel chocks behind the rear wheels. Loosen the lug nuts on the front wheels slightly using the lug wrench. Raise and support the front wheels using the floor jack and jack stands. Remove the front wheels.

    2

    Place a drain pan under the brake assembly. Clean the front brakes, with brake-parts cleaner, to remove the accumulated brake dust. Avoid breathing the dust from the brake system and vapors from the parts cleaner.

    3

    Remove the two 13 mm caliper-mounting bolts that attach the caliper to the caliper bracket on the brake system of the Expedition. Lift the caliper off the caliper bracket and brake pads.

    4

    Apply a thin coat of anti-squeal compound to the back of the brake pads. Allow the compound to dry while you prepare the caliper bracket for installation.

    5

    Slide the pads, one at a time, out of the caliper bracket. Apply a dab of silicon brake grease to the contact points on the anti-rattle clips attached to the caliper bracket. Slide the new pads into place on the caliper bracket.

    6

    Open the bleeder screw on top of the caliper. Slip an old brake pad onto the caliper pistons and use the C-clamps to push the caliper pistons into the caliper housing. Use one C-clamp over each piston, two clamps in total, to push the pistons evenly into the caliper. Close the bleeder screw while the C-clamps hold pressure on the pistons. Remove the C-clamps and clean the caliper with brake-parts cleaner to remove the brake fluid that has spilled out.

    7

    Slip the caliper over the brake pads onto the caliper bracket. Bolt the caliper to the bracket. Install the wheel and lower the Expedition to the ground. Pump the brake pedal several times to expand the caliper before driving the SUV.

Read More..

Brake bed in Procedure

(updated on Feb. 1st 2012)

Before bed-in
New brake pads and skimmed rotor were installed in place.

In order for the new brake set to work at its best, the rotors and pads should be properly bedded-in. This process can also be called as "brake conditioning", or whatever terminology.

Proper bedding improves pedal feel [no "on-off" braking feel], reduces or eliminates brake squeal, prevents and cures brake judder, reduces brake dust, and extends the life of pads and rotors.

If you Google around, you will find different procedures for brake bed-in. You may follow any of those procedures but Ive got my own way of doing it. You dont have to follow my way but you can take a peep... :)


myProcedure for Bed-in

Bed-in procedure can be annoying to other drivers so I had to perform the bed-in around 4:00am to 5:30am in two sessions during which time there is virtually no other vehicle on the road.


1st Session

Drove and accelerated the car to approximately 80kph and then applied the brake lightly until the speed dropped to around 20kph in 100m. Then accelerated back to 80kph and maintained the speed for 1 minute and then applied the brake lightly again. Repeated 10 times without completely stopping the car. After 10th braking, drove the car slowly for another 5km to cool down the pads and rotor before stopping.

Stopped the car for 30minutes to almost completely cool the brakes.

2nd Session
Repeated Session 1 at 110kph

Here is the result after the 2nd session...

... there is a slight blue tint on the rotor [disc] surface which is not in contact with the pad and a light grey film on the surface which is in direct contact with the pad.


The blue tint tells the rotor has reached break-in temperature and the grey coating is the by product of the chemical reaction between pad material and the rotor under extreme temperature and pressure. This layer enhances adherent friction hence minimizes squealing, increases braking torque, and maximizes pad and rotor life. Without which the braking force depends solely on abrasive friction.


3rd Session
For the 3rd Session, the car was driven 122km non-stop. During the first 50km the car was driven and braked normally in order to "bake-up" brake pads and rotors gradually and maintained the temperature and then performed THREE hard braking from around 120-140kph down to 20kph .

Fully baked rotor with near perfect transfer-layer* formation...
*click HERE to find out what transfer-layer is all about and its significance.

4th Session
This was the final session. The car was driven for 382km at normal speeds. Four times hard braking to dead stop was performed during the trip at approx. 50km interval. Braking performance was excellent. The best ever! Silky smooth but sure and firm. Adherent friction is superb.

Rotor condition after brake bed-in [conditioning] process was completed...
Brake rotor bed-in
Read More..

myNexT Car

General Spec:
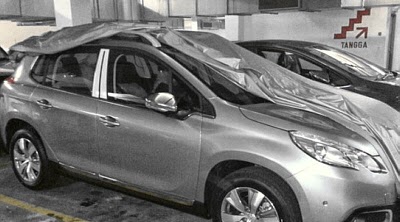
Affordable CONTINENTAL. Doesnt matter whether it is a 3-door or 5-door hatch but not too big - about the same size as the 206, but more powerful and agile than 206RC. A coupe is not acceptable.

Engine size:
Of course not more than 1.6 liter but "down-sizing doesn’t mean down-grading...."

Performance:
Should be as good if not better than the RCZ - i.e century acceleration in less than 7.5s and tops over 225kph w/o any modification.

Price:
Less than the current price of 308GT. Hint. Hint.. Hint...
Read More..

CKD Peugeot 308 Sneak Peek

Anything launched by Peugeot is worth waiting for. Its because Peugeot has a knack for incorporating extraordinary design ideas into mainstream cars.


The huge windshield, pointy face and stepped butt all add up to a futuristic shape that hides its height well. The front end features the familiar Peugeot gaping-mouth grille and catlike headlights.

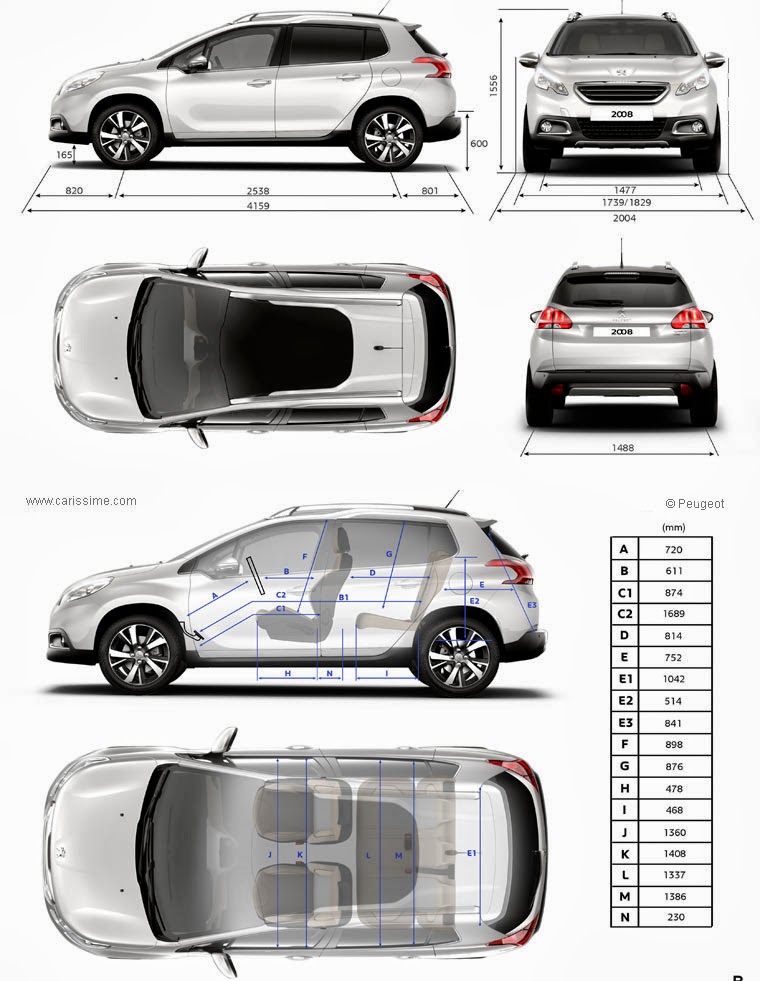
Interior quality is improved, and there is more space for driver and passengers. Cabin materials include a nice rubbery dashboard which is soft to the touch, unlike 206 hard plastics. The upper door sills are also covered in thin rubber, but they simply cover hard plastic underneath. At least all armrests are padded to keep things comfortable. Rear legroom is ample for the class.The good-sized luggage area is shorter than that of a sedan, but the available height makes up for it. There are small storage spaces around the cabin.

The CKD 308 THP has a 140hp 1.6-litre 4-cylinder with a turbocharger tacked on. The turbo makes itself heard with slight whooshing sounds. On paper it clocks off a 0-to-100 kph in less than 10 seconds, which is in my opinion better than any equivalent car - thanks to the impressive 240Nm of torque constantly available from 1,400rpm all the way to 5,000rpm.

The 308 THP is more like a budget racer - at around RM111k it is affordable! - comes standard with add-ons that Ahbeng, drivers of Japanese econo-boxes usually spend heavily on upgrading!

The 120hp VTi [non-Turbo] shall be around RM96k which is the logical alternative for the less spirited drivers.

Click HERE for Autoworld Forum on Peugeot 308


|Home|Fuel Consumption|Performance|uncles DIY|Car Size Comparison|
Read More..

4age silvertop wiring and conversion to MAP

For those people who want to the AFM sensor and to use MAP sensor but want to retain original wiring, you may refer to this diagram. I have labeled all the input and output at the ecu.

This is ecu diagram from 4age20v silvertop


And this is comparison between blacktop and silvertop ecu pinout. You might re-pin or made a converter to use a blacktop ecu into silvertop wiring.

Read More..

BMW M3 H00264

BMW M3 H00264 Video Clips. Duration : 2.78 Mins.


2006 BMW M3 The 2003 BMW M3 wearing the "M" badge of BMWs Motorsport division is a race inspired production car with an emphasis on performance and ultra drivability. High performance handling combined with an equally awe-inspiring engine makes this high-performance Motorsport creation an all-time BMW favorite. It is propelled by a 3.2-liter, six-cylinder engine rated at 333 horsepower and 262 pound-feet of torque that can get you 0-60 in approximately 5 seconds. It is equipped with a sequential manual gearbox that offers both manual and automatic driving modes. Although the SMG is by definition a manual transmission, its clutch is electronically controlled, and theres no clutch pedal. Drivers can use either steering column-mounted paddles or the shift lever to change gears in manual mode. Unlike other systems, SMG allows you to alter the quickness of the shifts, and in its most aggressive shift program, its said to be faster than Ferraris Formula One setup. Standard features on the coupe include 18-inch wheels with Z-rated rubber, automatic climate control, 10-way adjustable sport seats, leather and cloth upholstery, one-touch power windows, heated power mirrors, a CD player, an auto-dimming rearview mirror, automatic headlights, rain-sensing wipers and keyless entry. Safety features include four-wheel antilock disc brakes, stability control, front side-impact airbags and head curtain airbags for the front. This model is equipped with BMWs competition package, which ...


Keywords: BMW M3 For Sale, 2006 BMW M3, Used M3 For Sale, M3 with Competition Package, Used bmws For Sale
Read More..

How to change break pads 2

How to change break pads 2 Tube. Duration : 9.97 Mins.


How to change break pads


Tags: disc, breaks, pads, rotors, car, yt:crop=16:9
Read More..

Tips for Removing Scratches on Windshields

With the cost of replacing windshields getting higher all the time, it pays to take the time to repair them if possible. Scratches are a problem that should be addressed not just because they are unsightly, but also because they can be dangerous. Scratches reflect light in a way that hinders visibility, and it can even be blinding when facing bright, direct sunlight. Fortunately, many scratches can be repaired.

Gather the Materials

    There are just a few materials needed for repairing scratches in glass, but they may take a little time and research to find. You will need some jewelers rouge, also known as cerium oxide. This can usually be found at a jewelery supply shop or hobby store. Make sure that you buy the type that is red in color. You will also need glycerin, which is available at most pharmacies. Buy these in small quantities, as each batch only requires 2 tablespoons of each product. Gain access to an electric buffer and buy a firm felt pad for it. Then gather a small bowl, some clean rags, clear nail polish and a little window cleaner.

Technique

    Make a paste by mixing the water, glycerin, and jewelers rouge in a small bowl. Apply a small amount of the paste onto the scratch on the glass. Mount the felt polishing pad on the buffer, and begin by gently rubbing the compound on the window. Apply pressure a little at a time, as you do not want to press too hard and crack the glass. Let the area dry briefly, approximately 30 seconds, and then wipe the area clean with a rag.

Finishing Touches

    Inspect the area and look to see if it has been repaired to your liking. If not, repeat the process. Many times, multiple applications will yield better results. If you find that there is a little distortion in the surface of the glass after finishing, you can apply a little clear nail polish to repair it. Allow it to dry completely and finish the job by cleaning any residue with window cleaner.

Read More..

How to Get Rid of a Crack on a Windshield

How to Get Rid of a Crack on a Windshield

Dealing with cracks and chips to your car windshield is crucial to ensure the safety of yourself and others traveling in your car. Cracks are often caused by rocks, pebbles and other debris on the road bouncing off the windshield. In most cases the damage is insignificant, but repair must be carried out as soon as possible to stop the crack weakening the entire structural system of the windshield, which can lead to more serious damage.

Instructions

    1

    Leave the crack alone until you have the time and the necessary tools to attempt a repair. Modern car windows normally have a laminated plastic coating, which means that while parts of the windshield may shatter or suffer damage, underlying glass layers wont explode just because of a small crack or chip. There is enough strength in the windshield for it to stay intact long enough for you to take the car to a garage or auto repair shop.

    2

    Apply clear adhesive tape to the crack if it is more substantial; keep a roll in your glove compartment for quick and easy access. Use a wide roll so that any tiny, loose glass fragments are kept intact and to provide adequate preservation of the glass layers and laminate coating. Dont go overboard with the tape though, as you dont want it to restrict your view when driving.

    3

    Park your car on a level surface when you are ready to repair the crack.

    4

    Clean the windshield with soapy water, ensuring you remove all debris from the crack using the motorized rotary tool in your repair kit. You can use the tool to widen the crack slightly as this will make it easier to apply the resin.

    5

    Attach the repair stickers to the inside of the cracked windshield. Applied correctly, the sticker should cover as large a section of the cracked windshield as possible.

    6

    Inject the resin into the crack using the pump or syringe included in the repair kit. Avoid air bubbles by maintaining an even flow of resin. The resin must make contact with the inside surfaces of the windshield.

    7

    Attach the remaining stickers over the resin and leave it to cure for a minimum of four hours to give it time to set into the windshield. When you remove the stickers inspect the spot closely to make sure the resin has completely cured.

    8

    Take your car to a qualified professional if you dont feel confident getting rid of the crack yourself. In severe cases, if the windshield shatters, the entire glass pane will have to be replaced.

Read More..

Will 308Turbo suffer power loss when running on RON 95

RON stands for Research Octane Number - determines anti-knock quality or resistance to pre-ignition or detonation as it burns in the engine cylinders.

Myths: Get more power by using high RON fuel

RON is not energy content. Power output or fuel mileage can NOT be improved by burning higher octane fuel than a particular engine was designed for. A higher octane fuel does not add any more hydrocarbon content or oxygen, the engine cannot produce more power. Hence using fuel with RON higher than what the engine requires may not be necessarily gaining better performance and lower RON doesnt mean less power either. Using higher RON rating also may not necessarily be the best for the engine - there is no guarantee of greater power or a more environment-friendly option as the RON number gets higher unless the engine is designed specifically to run on it.

Peugeot 308 turbo can run [effectively/efficiently] on RON95 as indicated by the label on the back of the fuel filler lid. No worry! Gunalah tanpa waswas.

UPDATE: RON 95 SUITABLE FOR NAZA, KIA AND PEUGEOT VEHICLES - The Naza Automotive Group has encouraged owners of its petrol-powered Naza, Kia and Peugeot vehicles to use the RON 95 fuel. In a statement, the company said RON 95 was suitable for the Naza Ria, Naza Citra, Naza Suria, Naza Citra II Rondo, Kia Sportage, Kia Carnival, Kia Carens, Kia Picanto,Kia Optima, Kia Spectra5, Kia Spectra, Kia Rondo, Naza 206 Bestari, Peugeot 206,Peugeot 407, Peugeot 308 Turbo, Peugeot 308Vti and Naza Forza.

Ive also tested RON 95 on all myPeugeots [405, 308, 206] and Mercedes Benz W124. It seemed that the fuel ngam with all those cars - in fact the tail pipes are cleaner [less carbon black]. The engine also run smoothly on RON95 - probably better combustion inside those engine cylinders.

Happy Motoring!


Frequently Visited Pages:
| Home | Fuel Consumption | Performance | uncles DIY |
Car Size Comparison | Motoring Myths | RON95 |
Read More..

Money Saving Tips to Lower Your Driving Costs

In hard economic times we need to make every dollar stretch as far as we can but sometimes, to save money, you have to spend a little money. This is especially true where your car is concerned. Simple low cost maintenance procedures and driving habits can save you a lot more money over the long run.

An unknown author came up with the acronym B-L-O-W-B-A-G that makes it simple to remember how to take care of the most important features on your car.

B = Brakes - Worn brake pads can damage the brake rotors leading to more expensive repairs later on.

L = Lights - It is easy and cheap to change your own light bulbs and good lights can prevent a collision by making your car more visible. Keep extra bulbs in your glove compartment just in case.

O = Oil - Oil changes are cheap and, when done on schedule, will extend the life of your engine. Make sure you use the manufacturers recommended oil type. Check your oil level often and keep an extra bottle handy just in case.

W = Water - Check your water level and make sure you use the recommended coolant for your engine. Check your radiator for leaks and make sure your windshield washer reservoir is full.

B = Battery - Check for corrosion on your battery terminals and, if your battery is not sealed, check the water level and replace it with distilled water when necessary.

A= Air - Check your tire pressure when the tires are cold. Maintaining proper air pressure will prevent wear on your tires and extend your gas mileage.

G = Gas - Make sure your gas gauge is showing the proper level and use the proper octane level recommended by the vehicle manufacturer.

Other money saving tips to remember include:

Tires - Rotate the tires every time you get your oil changed. Rotating your tires will prevent excessive wear and extend the life of your tires. Check the tread; worn tires can cause you to skid on wet roads or they can blow out and possibly cause a collision.

Suspension System - Making sure the springs and connections are in good working order will help extend the life of the vehicle and prevent more expensive repairs later on.

Reduce your insurance rates by attending a defensive driving course or traffic school - In some states, voluntarily attending a defensive driving course can help you reduce your insurance rates. It can also help you improve your driving habits and thus prevent more wear and tear on your vehicle. Check your state laws to see if you are eligible.

Drive the speed limit - Speeding, just by a little bit, wont save you much time and it can cost you money. For example; a ten mile trip at the posted speed of 40 mph will take 15 minutes. Driving 5 mph over the speed limit will only save you a little over a minute but it will cost more gas, create more wear and tear on the engine, and possibly lead to an expensive speeding ticket.

Read More..

DIY Replacement of Windshield Glass

If you need to replace the windshield glass in your vehicle, this will take at least two people. Also, the exact shape and size of the glass you need will vary, and some precise steps in the replacement procedure can also differ. Check with an auto-glass expert for details on your particular model.

Removal

    If youre replacing the front windshield, you need to remove the rearview mirror from inside the car and the wipers from the outside; some rear windshields also have a wiper that needs removing. All these items are usually screwed on, and youll need to rock the wipers to loosen them after removing the screws. If the windshield has a trim panel around it, remove its screws and then use a trim-removal tool, which slips under the trim to catch and remove the clips. If the rubber gasket around the glass is in good condition, just break the seal around it by running a large stick across it. If this gasket is dry or cracked, however, you dont need to save it and must replace it. Cut through the gasket with a knife by inserting it down the middle and running it across the edge of the glass; you need to be careful that you dont actually hit the glass. Now you need to have you assistant sit on the hood or trunk while you enter the car. From within the car, use your foot and the large stick to push out the glass without kicking it. Your assistant needs to be ready to catch the glass. If you cut the gasket, youll need to remove the outer part from the frame; if its intact and in good condition, pull it off of the glass for use with the new glass.

Installation

    The windshield frame needs to be clean of rust, corrosion and other debris before installing the new glass. Leaving a new gasket in the sun or a warm room so it will soften. When attaching the gasket to the glass, its thick end goes on the inside along the glass edge. The groove on the outer side should be coated with petroleum jelly; then wrap a nylon cord around that groove so both ends of the cord meet at the bottom center of the gasket and stick out another 2 feet. As your assistant lays the glass on the frame from outside, you can pull the ends of the cord into the interior. You need to pull on one of these ends while the other person pushes on the glass to slip the gasket into position. Before you reconnect the trim, mirror and wipers, it will help to wipe away any excess petroleum jelly.

Read More..

How to Remove a Windscreen Chip

How to Remove a Windscreen Chip

Getting a chip in your windscreen can do more than just look ugly. A chip can very quickly develop into a large crack, allowing moisture into the layers of the windscreen, which would then have to be replaced. However, so long as the chip is smaller than a quarter, it is possible to repair the damage yourself. Windscreen (or windshield) repair kits are available in the automotive section of most major retailers.

Instructions

    1

    Dry the windscreen completely. If it is raining or snowing, move the car into a garage to allow it to dry. You can use a hair dryer to hasten the process, but you must make sure there is no moisture inside the chip. If there is, it will get sealed in and cause the windscreen to fog.

    2

    Clean the damaged area with acetone and a paper towel. Acetone will evaporate quickly, but dont use so much that it soaks into the chip.

    3

    Peel the backing film off the repair kits adhesive strip and press the strip onto the windscreen, centered over the chip. Rub it with your fingernail to make sure it has a very strong bond. Once it is secure, peel off the front piece of film, leaving only the adhesive strip.

    4

    Stick the plastic adapter onto the adhesive strip, centered over the chip. Make sure it is secured by rubbing it with your fingernail.

    5

    Turn the syringe of adhesive up (with the plunger pointed at the floor) and remove the cap. Pull the plunger back slightly to prevent material from spilling out of the tip.

    6

    Attach the tip of the syringe to the plastic adapter.

    7

    Pull the plunger all the way back with the syringe attached to the adapter. This will create a vacuum, pulling all air out of the chip. Hold the plunger this way for a full minute, allowing the air from the chip to bubble up through the adhesive. The adhesive will settle down at the tip of the plunger.

    8

    Let go of the plunger handle once all of the air has bubbled through the adhesive. The vacuum will force adhesive into the chip.

    9

    Repeat the pullback and release action four or five times to fully impregnate the chip with adhesive.

    10

    Remove the syringe, plastic adapter and adhesive strip from the windscreen.

    11

    Wipe off excess adhesive from the windscreen with acetone on a paper towel, but be sure to leave a bump over the chip.

    12

    Allow the adhesive to cure for several hours.

    13

    Use a sharp razor blade to slice the adhesive bump off the windscreen, completing the repair.

Read More..

Technical Resources OBD Error Codes

If you have OBD tools that can read error codes but give no description, Permoveo-Euro Specialists has got Auto Diagnostic Technical Resources for you to refer. Just select vehicle manufacturer from the pull down menu and enter OBD error Code in the dialog box provided then click on "Lookup Error Code".

e.g: Fault Code P1385

youll get this...

http://www.permoveo.ltd.uk/TechnicalResources.aspx
Read More..

Peugeot RCZ or 207RC or just go play golf

Latest insider news in my mailbox indicates that Peugeot RCZ will only come to Malayan shores with the largest heart available, probably will be punching out not less than 220bhp at the prorata price of around RM1k per bhp!.
For now it can be assumed and speculated that lower cost units [probably costs less than RM188,888? - based on interpolated approx. price in the UK] powered by detuned 150bhp or/and 175bhp power plant shall come later [or never ?].

Peugeot 207 RC
What about 175bhp 207RC?
Having power plant similar to its bigger brudder [308GT] but just a fraction of Celcius cooler than the RCZ flagship, 207RC does century acceleration in 7.1sec. and tops >220kph.
Again, unfortunately Id been told that at this time there is no plan as yet to be imported for local enthusiasts. But there is no harm to keep the dream alive, isnt it?


|Home|Fuel Consumption|Performance|uncles DIY|Car Size Comparison|
Read More..

wiper repair

In the midst of a 2,000 mile journey and over 800 miles from home the wiper system failed during a downpour. I had no tools and there was a deadline to travel 800 miles within 17 hours.


The wiper arm had no control or sync with the wiper controls. So I narrowed down the issue to be the wiper arm loose on the wiper motor. Driving at highway speeds the wiper would edge up on the window as wind caught it. Luckily C$ was able to pull the wiper arm back down every few hours.


So, I stopped at a fuel station and bought a bottle of Rain-X, and applied it to the windshield. This worked to get back before the deadline without a wiper.


The Rain-X did its job and we were able to make the drive in 15 hours.


Once I was able to get to tools I took the wiper arm off of the car using an alen head to remove the plastic cover and an 18mm wrench to remove the retaining nut holding the wiper arm to the car.

The teeth inside of the wiper arm were stripped, but the teeth on the wiper motor gear were in perfect condition. I blew on the wiper arm teeth to clear out the metal shavings.

I aligned the wiper arm onto the wiper motor gear. I tightened the 18mm nut, to hold the wiper arm on, and re-installed the wiper arm cover. Volla! It works again. Free fix!
Read More..

How do I Replace the Windshield in a 1996 Accord

How do I Replace the Windshield in a 1996 Accord?

Honda introduced quality mid-size vehicles in 1976. In the mid-1990s, the Accord was considered among the most reliable vehicles on the road. By 1996, it was one of Japans best selling cars. The 1996 Honda Accord is known for its compactness and its safe and reliable features that require little maintenance. Because there is nothing complicated about the Accord, replacing any parts, such as a damaged windshield, can be corrected with a few do-it-yourself tools. If the windshield is damaged beyond repair, contact a Honda manufacturer for replacement glass.

Instructions

    1

    Contact a Honda manufacturer in your area to order a replacement windshield that fits the 1996 Accord vehicle specifications.

    2

    Put on safety glasses and utility gloves before handling hazardous glass and chemicals.

    3

    Cut the windows inside molding adhesive with a windshield knife. Make the cut at a slow and steady pace around the perimeter of the adhesive.

    4

    From inside the vehicle, place pressure on the windshield. Slowly, push on the glass with both hands to dislodge it from its seal. Ask an assistant to stand on the outside of the Accord so he can catch the glass as it falls from the seal.

    5

    Clean the threshold with mild soap; wipe away any sticky adhesive residue left from the weather stripping before replacing it with new glass.

    6

    Add urethane caulk to a caulk gun as directed on product label. From inside the Accord, bead a thick layer of urethane caulk on the inside of the windshield frame. Once again, have an assistant help set the windshield inside the threshold. Place your body weight pressure on the replacement glass for a few moments to allow the caulk to create an airtight seal.

    7

    Let the urethane caulk set for 24 to 48 hours.

Read More..

No more PEUGEOT and 308 Turbo for me!

True, since October 2012 Ive got no more "PEUGEOT" as well as the "308 Turbo". Theyre not stolen or sold to somebody else either but Id to remove them for good.


I think the car looks cleaner without those emblems...

Read More..

How to Replace the Rear Brake Pads on a 1995 Buick Regal

How to Replace the Rear Brake Pads on a 1995 Buick Regal

The 1995 Buick Regal was produced as a Custom Coupe and a Gran Sport sedan. It was equipped with the choice of a 3.1-liter V-6 or a 3.8-liter V-6. The 1995 Regal came standard with four wheel anti-lock disc brakes, including ventilated front discs. The rear disc brakes on the 1995 Regal have calipers, pads, and rotors similar to the front disc brakes.

Instructions

    1

    Remove the initial torque from the rear wheel lug nuts, using a tire iron. Do not remove the lug nuts completely, but turn them so they are unstuck (3/4 turn). Lift the rear of the Buick using a 2-ton jack or a jack with greater capacity. Set jack stands beneath the rear suspension arms or the rear axle beam, just inside the rear wheel assembly. Remove the lug nuts completely with a tire iron, then remove both rear wheels from the Regal.

    2

    Remove the rear caliper mounting bolts on one side of the Regal. Use a 3/8-inch ratchet to turn the caliper bolts counterclockwise until they are removed. Remove the caliper from the brake assembly, using a pry bar to gently pry the caliper off. Set the caliper on the suspension arm behind the brake assembly. Do not let the caliper hang freely or you can damage the fragile rubber brake hose.

    3

    Remove the old brake pads from the caliper mounting bracket, using a pry bar to gently pry the pads off if necessary. Lubricate the portion of the caliper mounting bracket that touches the brake pads. This is the part of the mounting bracket that the tips of the brake pads slide into. Proper lubrication is essential in reinstalling the brakes, to ensure optimal performance and function of the new pads. Use caliper grease that is rated for disc brakes.

    4

    Install the new brake pads onto the caliper mounting bracket. Two of the brake pads have wear indicators. These pads go on the inside of the caliper bracket, behind the rotor. Do not place both pads with wear indicators on one side of the Regal. The wear indicators are small metal tongues on the end of the pads that have a 90-degree bend in them, and are the reason for the "squealing" noise when pads get low. Install the wear indicator-equipped pad behind the rotor, and the non-wear indicator pad on the front or outside of the caliper bracket.

    5

    Lubricate the backing plates or shim plates on the back side of both of the newly installed brake pads. Failure to lubricate the back of the pads can cause squeaking in the new brakes within a couple hours of installation and driving. Dab caliper grease on the back side of the pads to create a thin film on the pads.

    6

    Install a 6-inch extension onto a 3/8-inch drive ratchet. On the opposite end of the extension install a caliper brake tool. The caliper brake tool is a 6-sided cube that has different adapter teeth on each side for use on multiple different vehicles. The rear calipers of the Regal have oscillating or rotating pistons. As the piston expands when you hit the brake pedal, it also rotates in a screw-like motion. The brake tool is essential in working on the rear brakes of many vehicles, as there are many vehicles with rotating rear caliper pistons.

    7

    Insert the caliper tool onto the piston of the rear brake caliper. Hold the caliper in one hand, while holding the ratchet, extension, and tool in your other hand. Turn the ratchet clockwise while simultaneously applying pressure to the piston on the rear caliper. This turning and pushing movement will compress the rear caliper piston. Compress the piston until it is nearly flush with the inside back wall of the caliper. The piston does not compress completely flush.

    8

    Install the compressed rear rotor back onto the Regal with one hand. Start the caliper mounting bolts through the caliper and into the mounting bracket, by hand. Turn the bolts clockwise to start them until the caliper can stand freely without you holding it. Tighten the caliper bolts to between 60 and 80 foot-pounds of torque. You can approximate this without using a torque wrench by snugging the bolts with a 3/8-inch drive ratchet and socket, then turn the ratchet 1/2-turn farther once the bolts are snug -- but using a torque wrench is best.

    9

    Repeat Steps 2 through 8 to complete the second side of the rear pads on the Regal. Performing this project on one side of the vehicle at a time will provide a visual reference for how the brakes look when they are assembled. This is useful if you have any questions about how the brakes go back together.

    10

    Install the rear wheels on the Regal after you have installed and torqued both rear brake calipers on the vehicle. Snug the lug nuts onto the wheel studs, using a tire iron. Lift the rear of the Regal off of the jack stands, and remove the jack stands from beneath the Regal. Lower the vehicle and tighten the lug nuts between 90 and 110 foot-pounds of torque. Use a certified torque wrench and lug nut socket to properly torque the wheel nuts.

Read More..

New Pages Up!

Change Brake Pads and Car Wash Trick are up!


Read More..

Swapping front and rear wheels with one jack

A few readers asked me how could I swap between front and rear wheels/tyres by using only ONE jack. Let me tell u how...

Precautions: Make sure the jack is placed on a flat and hard [non-yielding] surface. After jacking up, place something [such as stacks of bricks or wood blocks] underneath the car as back-up and safety measure to prevent any unwanted incident from happening.

1. Locate the "Center of Gravity" marker as shown below - i.e beneath side sill near front tyre.
91053542
2. Before jacking up make sure parking brake is engaged and gear lever at position "P". Remove wheel bolt head covers by using special tool [stored in the spare tyre well, yellow in color] then loosening em by a quarter-turn each. Jack up the car.
91053544
3. See, using only one jack both tyres are in the air!
91053546
Loosen wheel bolts to remove wheels/tyres...


Good Luck.
Berhati-hati dijalanraya


Frequently Visited Pages:
| Home | Fuel Consumption | Performance | uncles DIY |
Car Size Comparison | Motoring Myths | RON95 |
Read More..

2008 HYUNDAI AZERA

2008 HYUNDAI AZERA Madison WI (608) 807-0468 www.zimbrick.com Formore information on this vehicle and our full inventory, call Internet Team at (608) 807-0468. Zimbrick Fish Hatchery Rd 1601 W Beltline Hwy Madison, WI 53713 ONE OWNER,REMAINING FACTORY WARRANTY,MOONROOF,LEATHER INTERIOR,HEATED SEATS,POWER SEAT,STEERING WHEEL CONTROLS,FOG LIGHTS,ALUMINIUM WHEELS,AUTOMATIC CLIMATE CONTROL,REMOTE KEYLESS ENTRY,SECURITY ALARM,AM CD PLAYER,MUTI DISC CD PLAYER,LEATHER WRAPPED STEERING WHEEL,ELECTRONIC STABILITY CONTROL,TRACTION CONTROL,SIDE IMPACT AIR BAGS,SIDE CURTAIN AIR BAGS,REAR PASSENGER SIDE CURTAINS,ANTILOCK BRAKES,ROTATE TIRES,REPLACE REAR BRAKE PADS,INSTALL NEW AIR FILTER,CHANGE OIL AND FILTER,SAFETY INSPECTION COMPLETED

Read More..

How to Repair a Stuck Rear Drivers Side Window

How to Repair a Stuck Rear Drivers Side Window

The rear drivers side windows on your vehicle may occasionally become stuck in either the closed or open position. The usual causes of this malfunction include the untimely failure of the window regulator or window motor. The window can also fall off or become stuck on its track if the glue holding the window to the track fails or if the track is obstructed by debris. Diagnosing and repairing this problem necessitates the removal of the interior door panel and trim.

Instructions

    1

    Turn the ignition key to the "On" position and attempt to operate the rear drivers side power windows. If you can hear the motor operating but the window wont move up or down, the window may be stuck on its track. If you cant hear the motor operating, the motor may need replacement. Check the fuses for the power windows before attempting to remove the window motor.

    2

    Disconnect the negative terminal cable from the battery with a wrench. This will decrease the likelihood of shock and prevent the battery from being drained.

    3

    Open the rear drivers side door. Remove the interior door panel and trim. The method for removing the panel and trim will vary depending on the vehicle. Consult your vehicles service manual and be sure to keep track of all clips and screws.

    4

    Inspect the windows track for signs of obstruction. You may need to apply a liberal amount of lithium grease to the track. If the window is off-track, clean the window of all adhesive and apply urethane-based glue to the windows mounting point. Reattach the window to the mounting point and leave the window undisturbed in the up position for one to two days.

    5

    Inspect the window regulator and motor. The window regulator will need to be replaced if the cables are snapped or frayed. If the window motor does not work, it will also need to be removed. Methods for removing both components may vary depending on the vehicle.

    6

    Reattach the door panel and trim to the rear drivers side door when finished. Close the door and reattach the negative terminal cable to the battery.

Read More..

Nissan Altima Brake Job Part 2

Nissan Altima - Brake Job Part 2 Tube. Duration : 5.15 Mins.


Second part of the video. Useful if you want to paint your calipers.


Tags: Altima, calipers, caliper, brakes, brake
Read More..

How to Know if Crack Can Be Repaired in a Windshield

It happens frequently; a stone kicks up on the highway and damages the windshield. Sometimes it makes a small chip, while other times it can leave a long crack. No matter which type of damage your windshield incurs, a repair or replacement is in order. The trick is knowing which one.

Instructions

    1

    Get your vehicle safely stopped before assessing the damage. You put yourself and other drivers in danger by being distracted while driving down the highway. Get to a safe location well off the road before inspecting your windshield.

    2

    Assess the type of damage. If you have a stone chip, see if the hole goes all the way through the glass. If you have a hole that breaches both sides of the glass, your best and safest bet is to replace the windshield.

    3

    Measure the stone chip if the hole only affects the outside of the windshield. If the divot is 1/2 inch or less across, you can usually repair the windshield with resin.

    4

    Observe cracks for type. Spider-webbed cracks that resemble a stick with one or more branches are ineligible for repair. You must replace the windshield. If you have a single, relatively straight crack, there is a chance you can repair it provided the crack is no more than 6 inches long.

Read More..

Vestidos

Read More..

Blog Archive

Diberdayakan oleh Blogger.